Monday, June 18, 2012
Picturesque
Wednesday, June 13, 2012
Quilting with WOW Altamatz
Hi everyone, it’s Monique here. I was having a play with my Chevron Altamatz the other day, and the idea struck me that it would be so cool to use it to have a go at one of the latest crazes in Scrapbooking – Quilting.
Now, I have never been a quilter of fabric, but I am a dedicated follower of scrapbooking fads, so I decided to have a try anyway.
This is the layout I came up with – if you think it looks vaguely familiar, it’s because I have used the sketch from WOW’s May challenge, designed by the talented Wendy Smith.
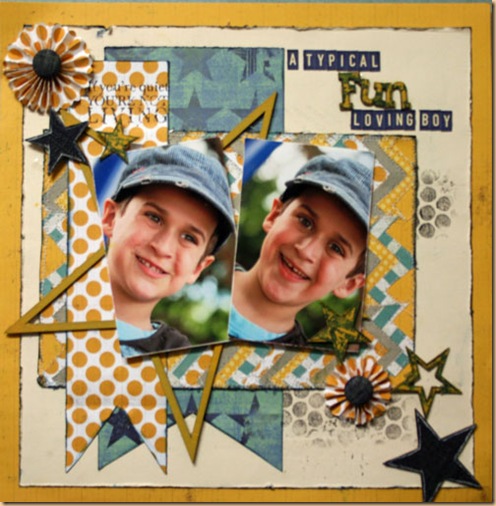
Now, the chevron-style mat I have under my photos there isn’t a piece of paper – it’s actually about 4 different patterned papers, quilted together – I loved how it turned out, and thought I’d share.
Here is how it looks without the photos on top.
So, if you want to have a go with this, it really is very simple – a little bit time consuming, but easy peasy to do.
1. First, choose the Altamatz you want to use. I used the 6x6 Chevron Flower ALTA022, but the other Chevron Altamatz or the Chicken Wire Altamatz would also work.
2. Select 4 Coordinating pieces of patterned paper, and trace about 12 of the individual “chevron” pieces onto each piece, and cut them all out.
3. Choose another piece of coordinating paper or cardstock as your base, and cut to the size you would like your final “quilt” to be.
4. Rule straight lines onto the base to keep your chevrons straight while you are piecing them together.
5. Alternate your chevrons to create a desired pattern, and adhere them down with some double sided tape.
5. When the whole base has been covered in chevrons, trim and stitch the pieces in place using zig zag stitch.
And you’re all done!!
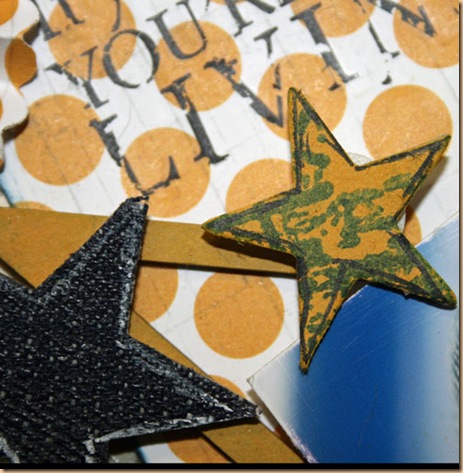
Also, here are some close ups of the chipboard I used on this layout, which I inked in a yellow Prima Chalk Ink. I’ve used individual stars cut from the WOW Star Border C655 and also WOW Star Frames C1468. On the smaller stars, I stamped a grungy stamp onto them with a darker Prima Chalk ink, after I inked them in yellow and allowed them to dry.
Well, that’s it from me. Hope I have inspired you with some new ways to use your WOW Altamatz and Chipboard.
Cheers,
Monique
Frames and Borders
Hi Susan here…
This post I wanted to share a layout I have done using the gorgeous AltaMATZ 12 X 12 CHICKEN WIRE ALTA016… I have lightly spritzed the background of some white cardstock with yellow Mr Huey’s spray so that only a small section appears on the page.
When putting my layout together I like to use coordinating colours and found that the mist on the chipboard is always a smidge darker than it appears when sprayed on cardstock… so to counteract this I have coated my misted chip pieces with Mr Huey’s calico shine which gives the mottled metallic appearance to the chipboard and lightens it at the same time. The WOW chipboard pieces I have used on this layout are DECORATIVE BORDER C1454 and ORNATE FRAME.
Tuesday, June 12, 2012
WE ARE LOOKING FOR A NEW DESIGN TEAM MEMBER - IS IT YOU???
Applications close: 30 June 2012
Monday, June 4, 2012
THE LAST MAY SKETCH CHALLENGE WINNER!!!
The winner was TRACEY THORNE!!! Congratulations Tracey!!
This was Tracey's page.
Thank you to everyone who entered our May Sketch Challenge!
From July 1 there will be some new and exciting changes happening with our blog so keep checking back to see what will be happening!!!
Suzanne
WOW
Saturday, June 2, 2012
OUR MAY SKETCH CHALLENGE WINNERS
Hope you are all having a great weekend!!
Well two of our winners from our May Sketch Challenge have been decided!
Our first winner of our Random Draw is CAROLYN ELDER!! Congratulations Carolyn!!!
Here is Carolyn's entry.
Next up was the winner picked by our Design and Creative Inspiration Teams and the winner was SUE SMITH!!! Congratulations Sue!!!
Here is Sue's entry.
Our last winner of our May Sketch Challenge will be announced tomorrow night and it will be decided by YOU the fans on Facebook! The page with the most amount of "Likes" by 6pm on Sunday the 3rd June 2012 will be the winner of the Public Vote.
Get voting by "Liking" now!!!!
Good luck everyone!!!
Suzanne
WOW
Wednesday, May 30, 2012
WOW Chipboard And Enamel Chips!
- Rub your WOW Chipboard with an Embossing Pad, giving it an even coat.
- Sprinkle the Enamel Chips over the Chipboard, shake off excess.
- Heat set with the heat gun.
- Repeat to build up the Enamel.