Photobucket Photobucket Photobucket Photobucket Photobucket

Sunday, July 8, 2012

New Release-July- Kellie Moore

Hi Scrappers,

It's Kel here. This month I have 2 pages to share with you using the NEW Releases for July.

My first page uses a 'C1532 True Love' title.....and what perfect timing as my husband and I only got married a few months ago :)


I have tried to keep the design minimal to give the chipboard a chance to pop and to keep it more of an 'elegant' page. I used pinecone ink to cover the chipboard....


My next page is of the other favourite people in my life..."C1543 My Sons" as the title suggests :)


I used green paint on the title which has made it stand out....


That's it from me today, I hope you get your hands on some of this gorgeous new chipboard.
Til next time


Happy Scrapping
Kel x

Friday, July 6, 2012

personalised mini albums

hello all

Today, Im going to show you some Personalised Mini Albums that WOW have made for me. 

This is a great gift idea, make your own original minis as gifts, for birthday, christmas, teachers, farewells, they also can be used as an autograph abum for a special party, like 21sts.

This first album, I have made for my bff and her family, they recently took Mark away sailing for his 50th birthday gift.....he is a sailing lover!

I asked WOW to design a cover that was in two parts, the ship and then the front page.

Then I have added a packet of 8x8 album refills inside for them to put their photos in, this way its not a standard album of a few pages of mdf, its like a normal album with my cover.


Here is the cover....I have sprayed it with silver paint and the bottom of the album (waves) are covered first with gesso, then blue paint, then micro beads and heat dried....to give the effect of rough seas (which the whole trip was apparently lol).

Then i covered the front solid page with a pattern paper of the sea. The fancy page is then glues to the top and add the album pages and the back with jump rings and its ready to fill up with memories of the trip.


close up here of the waves!


heres a close up of one of the titles on the cover.

In case you didnt know WOW make personalised chipboard for you....YEP, that right, design your own titles etc for your projects. 

Like I said earlier, it was Marks 50th birthday, so I had that title made. Also the top title of 'judds go sailing'...personalising the album makes it so much more special!.


Now this mini, I made for my som, Tom...he loves pigs and has a room full of them in all shapes and sizes. When we were at the Easter Show this year, he took a million (!!??) photos of the pigs!, so i got WOW to make this and I am going to print the photos he took and add them to the pages.


I think he is a bit cute.... and he came in piece, so i could work al the bits seperately and then glue him together.


His body is just paint, shading pinks and then the edges are perfect pearls and his toes are sprayed with a coffee glimmermist and micro beads have been added. I added some googly eyes.


...heres a close up of his toes.


I have an idea of adding a banner across his stomach...saying PIGS RULE.....which is what i hear constanty at home from the boy child! lol
I think he will love having a pig abum with his favourite photos in it.


I guess your imagination is the limit here....have a go at designing a mini album for that person who is so hard to think of a gift for.
Pop into your lss and ask for help, Im sure they can assist you in design and then order them for you.

Til next time
Happy Crafting
Sanx

Wednesday, July 4, 2012

San back with some RAW MDF

I have popped back today to show you some of our NEW MDF Products.


We can cut almost anything from our range for you in MDF, this enables a greater strength in the product, which is wonderful for OTP projects, but also they are great for layouts, as you can add the wood burnt look with any extra work!.


In the previous post, i showed you two 12x12 shadow box frames that had MDF added to them. Here is a look at some of those products in the raw!


These gates are awesome in chipboard....yet in MDF, the wood burn shows heaps more depth and the fine cutting on the top of the gates is enhanced so much.


 ...and see how these lovey flourishes and leaves show depth without adding any extra inks or mists.


 ...and who doesnt love a butterfly on their project?...how cool do these look!


The MDF surely makes the products look great.


Now if you are considering an OTP or love the thought of adding some mdf to your pages...get into your lss and get them to order someof this fabuous WOW mdf accents.


Pop back on friday...I will showcase a couple of personalised mini albums...YEP! we can do that too, imagine the fun, designing and making your own original mini album!.


See you friday
Sanx

Sunday, July 1, 2012

WOW week with San

Oh My ..... Its July, where did that half a year go?


San here with a little update from WOW


There have been a few changes in the design team for the rest of this year. We said a sad goodbye to Gilly Lester and Kaitlynne Roil, who are both off on new creative journeys. We have advertised for a new member and we received so many awesome applications, we are having trouble selecting a new member.....we will be announcing our new DT member very soon!


Here at WOW, we have also decided to change our blog and add some even more fun for everyone to play along with us and maybe win some awesome chipboard.


You will notice our format will include blog posts from our talented team and a NEW RELEASE WEEK, where you get to see the newest of our chipboard product and how the team use them.
And then watch for the CHALLENGE WEEK...play along and win win win!!.


So to start the new financial year off.......its me!!


Today I am sharing with you another product that WOW make and that’s MDF!
We can make almost anything in MDF, ask your local scrap store to help you if you want to make a special designed mini or frame.

SCRAP –OFF
So...we had a little scrap-off challenge at WOW and Wendy Smith and I were given the same product to use on this fabulous 12x12 shadow box. (gotta say the box itself is a great way to show off your layouts and add a lovely decorated piece to your decor)


My frame was designed to have pages changed as I pleased.

I have used gesso, both black and white underneath can spray pain in silver and gold, then dried them with a heat gun, this makes the gesso pop and the paint turns to a metal look.


All the add-on were made of MDF too.....the Gates, flourishes and Butterflies. This heavier material is awesome to have on OTPs, as they are handled much more than a layout.


I have basically left the MDF raw....love the burnt look.


On the vines, I added a scrapping of green pastels to the leaves, and then gave the whole frame a spray of a webbing mist to add splotches of white all over it.


so here is it finished.....with black rose ribbon, red lace and a few mini roses..and a big gold bow!


Wendy also received the same products and here is how she used it.

OTP frame

She misted her MDF elements (butterflies, gates and flourishes) in Glimmermist ‘Candy Apple’ and Mr Huey’s ‘Calico Shine’

otp1

She has used her frame as a shadow box,
and has put patterned paper and photos in it’s base

otp3

She has complimented the frame by adding a little birdhouse
and loads of flowers and pearls


otp2


It was heaps of fun to go head to head with Wendy lol
...and see how different they turned out.


Worth a thought for a fun 'get your mojo going' challenge with a freind or two...grab each of you the exact same stuff, give a time limit and go for it...never know what you might come up with.


And if you are thinking of a great gift idea for that hard to buy for person, what about one of these awesome 12x12 shadow boxes, decorated in colours for their home. Pop into your lss and get them to order you one 


See you Wednesday
San x

Thursday, June 28, 2012

WOW MDF Cog Frame


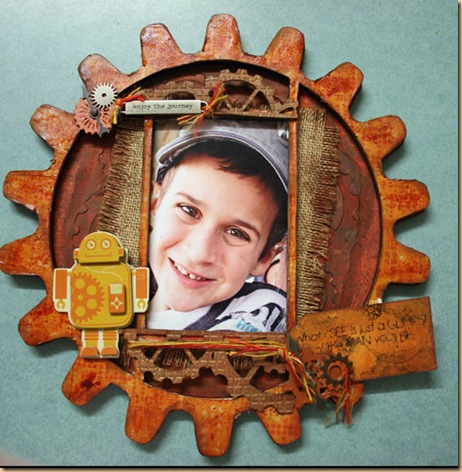
When Suzanne send me the MDF Cog Frame M194 I just knew I was going to have some creative fun with it.
This is what I came up with:
IMG_6604
If you wanted to make this frame, here are some simple steps:
1.  First trace around the front and back onto coordinating paper, and cut out – make sure you have the correct sides you want to face out.  Carefully cut out, and using a good glue, cover the front and the back of the frame in the coordinating paper.
2.  Ink around the edges to cover any oopsies.
3.  Now to add some texture!  First, use an Altamatz to apply some texture paste.  I used the BRAND NEW Cog Frame, but you could also use the Altamatz 12x12 Cogs ALTA002 or the Altamatz 6x6 Chicken Wire ALTA025.  Next, I painted on some Glimmermist – in Harvest Orange, THEN stamped a texture stamp around the edges to blend.
Step-1
4.  Finally, I added some hessian for more texture – you can never have too much texture…lol..
Step-2
5.  Now, on the front part of the frame, I sprinkled some more Glimmermist in Harvest Orange, and then when it was dried, I painted on some Crackle Accents.
6.  I adhered the photo behind the front part of the frame using double sided tape, and then adhered the front and back together using strong liquid adhesive.
7.  I then prepared some of my embellishments.  I used a new WOW Half Cog Border, which I ran through my cuttlebug with an embossing folder.
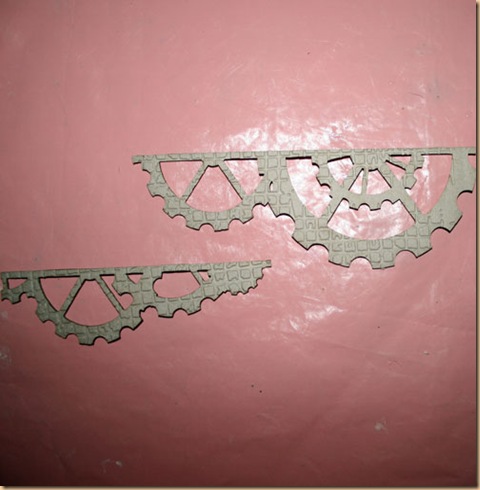
IMG_6578
8.  Then I sprayed it with glimmermist – in Harvest Orange and Creme de Chocolate.
IMG_6579
9.  I also used some single cogs from the Detailed Cog Border C234, and used some crackle paint to grunge them up a bit.  When they were dry, I rubbed some Black Soot distress ink into them too.
IMG_6580
10.  Finally, I assembled all my elements – tying everything together with twine, metal cogs a tag and a chippy robot.
Hope you like it!!

Monday, June 25, 2012

Just a few layouts to share

Hi guys its Em here, I hope you are all enjoying your WOW chipboard that you have in your stash, I know I am.  Today I am just going to share a few recent layouts I have created.

This first layout I used - Tia Flourish (C1474), classic alphabets uppercase (C1384) months of the year (1401) I’ve left the flourish raw but coloured the alphas and month with black sharpie and outlined with a white pen.

IMG_7230IMG_7233IMG_7234

This layout I have used - 12 x 12 circle frames (C828) wendy flourish (C1494)  I have painted the circle with a burnt yellow paint & coloured the flourish in with black sharpie and used a white pen to put a line through it. (can you tell that I love to use my white pen!)

IMG_7236IMG_7238

My last layout I have used - Banner border (C810), mum's boy title (RWL222) This layout about my son turning 3 I have sprayed the border with 2 different mists & The title I have also sprayed with mist.  I have also used The random stars altaMATZ (ALTA006) in reverse.

IMG_7239IMG_7240

Thats it from me for now, I will be back in July! Smile 

Em

Thursday, June 21, 2012

Some Mixed Media Using Altamatz


Hello again everyone, Monique here.   Recently, I have been loving using mixed media with my scrapping projects.  Whenever Suzanne sends me a new Altamatz, I always instantly start thinking how I can use texture paste and mist with it.

Here is a layout I have done recently using the 12x12 and the 6x6 random hexagon Altamatz.

Now, these are so new they haven’t been put up yet, BUT this would work just as well with the Cloud Altamatz ALTA026 or the Chicken Wire Altamatz ALTA016.

One think I have noticed when using Altamatz is they are made out of such a lovely thick acrylic.

This gives them such an advantage over other templates for mixed media use, as they don’t fold up as easily, and a lovely thick layer of paste can be applied.

This is the finished layout":

IMG_6475


As you can see, I have used texture paste on the larger hexagons, then used some Teal High Heal Glimmermist over the top to add colour.  I also dribbled some of the mist down.  Next I layered down some paper, and used the 6x6 Random Hexagon Altamatz to add another layer of mist – this time in grey. 

Here are some close ups:

IMG_6477

IMG_6478

I have also used the word “Play” from the Giggle Words Set RWL528.  I have inked it with a Prima Ingveld Bolme Chalk Ink, and then doodled around the outside of the word to give it definition.

Hope you are inspired to get messy with mixed media and give some Altamatz a go!