Photobucket Photobucket Photobucket Photobucket Photobucket

Sunday, December 8, 2013

December 8th

Welcome back to another day at the WOW blog and another dose of December Daily.
 
 
Back again to show you some more pages from my Dec Daily mini album.

NEW Products I've used:
Light & Dark veneer Trees
Chipboard swirly Christmas Tree
Dark veneer Bow
Light veneer 'Merry Christmas' bauble
Dark veneer small bauble


Come back again tomorrow for more goregous Words or Whatever Christmas inspriation. All of these items are available through your local scrap supplier.

Saturday, December 7, 2013

December 7th

HO HO HO

.....christmas time means chrissy cards to send to friends and family.

with the internet, texts and such, we have almost lost the card giving in our lives. i personally love the going to the letterbox and getting a card from a friend. I send homemade cards, usually with a photo of Tom on it.

Here are a few cards I have made using WOW minatures


Card #1
Using the bell bauble in wood veneer
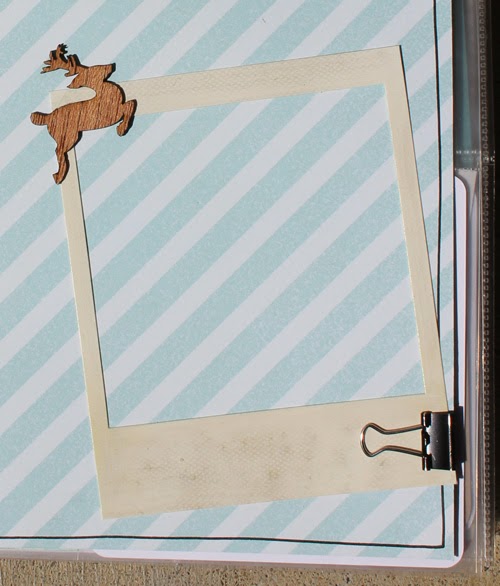


Card #2
washi tape tree with a wood veneer reindeer

 Card #3
christmas with stars bauble in wood veneer
 

Make a few cards this season for your loved ones using Words or Whatever products.
'Joy'
using 12"x12" Acid Burn AltaMATZ, 'Joy' chipboard title and new light wood veneer Candy Canes


For the background of this layout I used the 'Acid Burn' Alta MATZ sprayed with Glimmermist. I love how using this template gives you an instant base to build on.
The gorgeous mini candy canes pictured below are made from light wood veneer and come in 3 sizes, two of which I have used here. I coloured in some of the detail with gold Smooch ink, tied some little ribbon bows onto them and clustered them to one side of the photos - perfect embellishments for the layout.


To fit in with the colour theme of the layout I simply embossed the chippy word 'Joy' with a double layer of gold embossing powder.

 
We will be back again tomorrow with more inspiration for the festive season, all using the amazing Words or Whatever products, available through your local scrap suppliers.

Friday, December 6, 2013

December 6th

good morning....chrissy is getting closer and you are probably at the gift wrapping stage

How about making your own gift tags?

WOW have a huge range of small chipboard and wood veneer that are great for tags.

heres a few examples of quick ones i have made;

xmas gift tags


Simple packing tags with a rip of paper, washi tape or mist to alter them, then add a little WOW and they are ready for adding to your gift.

Tess here adding on from Sandra, with a quick Christmas layout. I know one of my favourite things at Christmas is taking photos of my Christmas tree all lit up at night. We always put out tree up on December 1st, but it usually takes a few days for me to get around to taking the night shots. Most years I get a few at the start of the month and a few once under the tree is stocked full of wrapped presents.


I have used the chipboard 'Christmas' part of the 'Babys First Christmas' title, which has been coloured with a red sharpie then the stitching added with a white gel pen. The best part of chipboard is that it can be cut and manipulated to suit your project.


I have added a chipboard bow to the 'Christmas' title which has been coloured with a black shparie marker and outlined with a white gel pen, and a chipboard Christmas stocking.


My last touches were a chipboard snowflake coloured with a white gel pen, and another chipboard stocking. All of these Christmas pieces are nice and small so can be added to any festive season project.
 
Get your LSS to get in some for you to make a personalised gift tag or gift for your loved ones.

Thursday, December 5, 2013

December 5th


Sharing some of my December Daily pages with you. I generally get all my foundation
pages ready & completed in Nov - then come Dec, all I need to do is stick in my
photos & finish off :)

NEW Products I've used:
Chipboard Stars Border
Dark Veneer Bauble
Light Veneer 'Joy' 
Dark Veneer Reindeer


From the Beginning

A layout created featuring the New Christmas Tree Frame with layers of gesso, inks, metallic rub and Dimensional Magic.
Also used on the page Dark Veneer Mini Christmas Baubles,
Wood Veneer Reindeer Ears and chipboard title 25th

 photo _DSC0033_zpsc9d70a2d.jpg

Some close ups

 photo _DSC0036_zps28867c30.jpg

 photo _DSC0037_zps9ac8abb1.jpg

 photo _DSC0038_zps76d5862c.jpg

Leave us some love and let us know what you are loving from this new release! We would love to hear from you.

Wednesday, December 4, 2013

December 4th

Tess here with you today sharing some of my December Daily album. This is my first year giving this a go and I am super excited about this project. We love Christmas in our house and I now have all of these other ideas that I am going to try and incorporate this year. I cant wait to see how this turns out.
For the album cover I have used the chipboard Star Border and embossed it in gold. I love the effect that it gives to the white space.

 
My title page is made using the new 'December Daily' chipboard title and the dark wood veneer doves. Aren't they gorgeous?
 
 
I have sliced a page down to make a little bit of an introduction to my album and came up with this using the chipboard star mini banner and one of the chipboard alphabets.
 
 
I have used the 'Trimming the Tree' dark wood veneer title on the small page. To make it fit I had to cut the Christmas tree off the end of the title, and found a home for it on my journal card.


'Christmas Card'
using chipboard Snowflakes
 

I love these chippy snowflakes which came up a treat with the addition of a layer of gesso topped off with fantasy white embossing powder which gives texture and a lovely subtle sparkle.
 

All of these products are now available through your local Words or Whatever stockist.

Tuesday, December 3, 2013

December 3rd

On the 3rd day of December we have some wonderful inspiration to share.
 
Christmas 2012
Using NEW dark veneers bells & ornaments
& AltaMATZ 6x6" Acid Burn ALTA171
 
Close ups...


A pair of Christmas cards using timber veneers
I have used the cute little Christmas tree and the super cute pair of bells


All I want for Christmas.....
Using a few pieces from the Snowflake set covered with diamond Stickles

 photo _DSC0008_zps34387a45.jpg

 photo _DSC0006_zps4887a6d4.jpg

We will be back tomorrow with more new releases to share.

Monday, December 2, 2013

December 2nd

Hi everyone!!!

It's Tarrah McLean here with you today to share another Christmas project with you using the gorgeous WOW chipboard products!!
Most of the items used on this project are New Release and will be available for you to purchase now!!  You can go here to see all the new products available!!

Today I am sharing with you an Advent Calendar that I created recently...

I have used the gorgeous new Heidi Swapp 'Believe' Collection for this project and of course loads of yummy WOW chipboard..

WOW products used:


I sprayed the WOW 12 x 12 Page Overlay 1 and the Dec 25th title with
 Heidi Swapp's Gold Lame Color Shine and left to dry thoroughly
I also inked the small bow found on the number
 13 spot from the mini Christmas Pack with Charcoal Ink

All other WOW pieces on the front were left in their
 raw state.....The idea with this advent calendar is that each
 day counting down to Christmas, you hang a trinket up...
so I punched a gold brad through each 'day' to hold the trinket and I cut
 up the New Christmas Stocking Banners individually and adhered some wire
 to each one...then inked them in various different colours
...they live in a little pouch on the back of the calendar....cute right?

I adhered Heidi Swapp Believe Chalkboard paper to some plain 12 x 12 chipboard for extra stability, I then stapled the green ribbon to the front of this and then adhered the gold WOW chipboard overlay over the top of it all....I love how this has turned out....

I hope you like my advent calendar and that I have inspired you to get your WOW chipboard out and create something pretty..stay tuned everyday on the blog this month for my gorgeous projects from the WOW design team....thanks for stopping by today...happy creating!!