Photobucket Photobucket Photobucket Photobucket Photobucket
Showing posts with label Lisa Warren. Show all posts

Tuesday, October 23, 2012

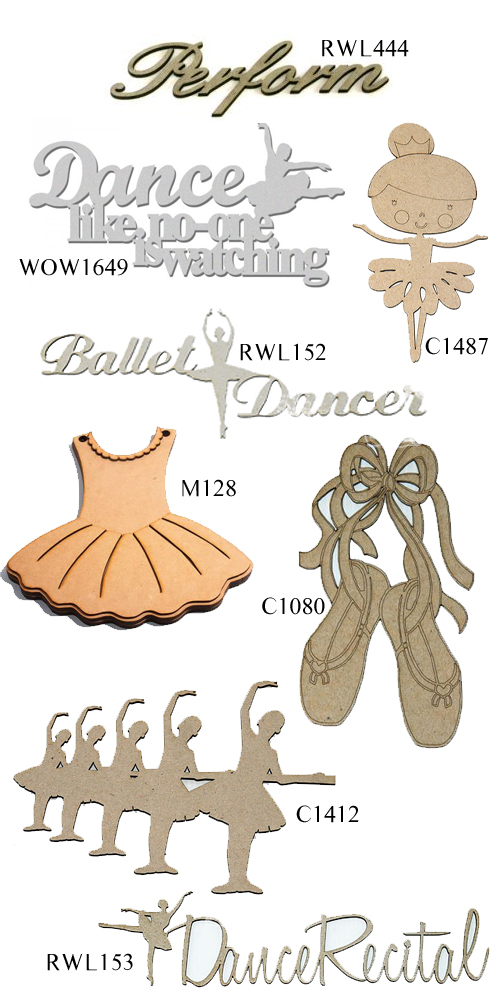
8 dance inspired chipboard pieces for your next recital

Towards the end of the year, dance mums across Australia are getting ready for the end of year recital...fitting costumes, learning how to do hair and make up, and ensuring their little dancers are at practice on time.  One thing's for certain, this is a time of lots of fun photos, and WOW has some beautiful pieces of dance inspired chipboard that will suit your next dance layout.

Here's an example of a layout I created recently using WOW's ballerina shoes... 
The chipboard has been coated in loads of glitter, in colours coordinating with my daughter's ballet costume...lilac and soft pinks by Martha Stewart.  I have coloured the insides of the slippers in a flesh coloured marker, then coated it in glaze, to add a little dimension. I have further defined the detail of the slippers by tracing over the laser cut lines with a sharp point, to remove the excess glitter and to reveal the lines. Once dry, the chipboard was adhered to my layout with foam tape.

From mini albums, to pre-cut chipboard titles and dancers silhouettes, WOW has your dance needs covered. Here's a few of my favourites...
So while you're preparing for the end of year concert, why not prepare your scrapbook pages too. Ask your local or online scrapbook store to order in your dance chipboard. There's plenty more to choose from in the WOW store, including jazz, tap, Irish, solo, and more!

Cheers,
Lisa Warren

Sunday, October 21, 2012

10 things I love about WOW chipboard titles...

Hi all! Lisa Warren here, and it's my turn to host the WOW blog this week. Join me as I share a few of my layouts, and some fun chipboard tips along the way.

Today's layout features one of WOW's pre-cut chipboard titles. I love them, and would happily place one on every single layout!  Here's why...
  1. The hard part of thinking of a title has been done for me!
  2. It's intricately cut, and the detail is fantastic.
  3. They're economical in price, and there's no left over letters to deal with.
  4. I can customise the look and finish of it to coordinate with my layout.
  5. They're really durable, and can take quite a bit of distressing, embossing, misting and paint.
  6. They're a source of inspiration when I'm stuck for a layout idea.
  7. I can modify the layout of the words with a few snips of a craft knife.
  8. It's easy to adhere to my layout with just a few drops of glue or foam tape.
  9. There's a tonne of them to choose from.
  10. If there's a title I want, I can ask my LSS to contact WOW, who will custom design it to suit!

For this layout, I have coloured the different words in two different markers, then doodled around the edges of each letter in a slightly darker shade to add some contrast.  I then applied a glaze over the top to make it nice and shiny.

WOW product code | C123

Have you tried WOW's pre-cut chipboard titles before? How did you customise it?

Cheers, Lis.

Sunday, August 26, 2012

WOW's August Challenge | Colour combination

This month at Words Or Whatever we are having a colour challenge! The pallet is shown below:
AQUA    PURPLE    CREAM
Graphic1
Here is how YOU enter:
  • Create a layout using the challenge colours...aqua, purple and cream, and include at least one piece of WOW chipboard.
  • Post your layout on your blog, then enter your projects via the linky below.  Be sure to share the actual blog post address, not your home blog address. 
  • There will be 2 winners. One voted on by our DT, and a random draw.
  • Remember to go to your local scrap store and grab some WOW chipboard and have a go at this months challenge.
  • Entries close Friday 14 September 2012 at midnight.
-------------------------------------------------------------------------------------------------------
 
Here are the WOW Design Teams example layouts…
 
“Shazam” – By Susan Longman 
IMG_9306

IMG_9307
 
“Forever” - by Wendy Smith
WOW Products used: Date plaque, mini heart banner, peacock feather, ‘Forever’ title
forever

forever1forever2forever3
 
"Cherish" by Lisa Warren
WOW products used: Mini Dragonfly C1053 and Cherish chipboard title C571
 
 
“Beautiful” by Sandra Henderson Staples
 
 
“Content” by Kellie Moore
 
 
Cuppie Cake by Kerryn Fry
Photobucket
Photobucket
Photobucket
 
 
“Perfect friends” by Emma Allen
IMG_9192
IMG_9194IMG_9195
 
 
" Live All Your Dreams" Monique Follett
 
WOW products used:  Altamatz - 12" Clouds, Mini Cog Set, Lower Case Block Alphas


Here's those challenge details again:
Graphic1
Here is how YOU enter:
  • Create a layout using the challenge colours...aqua, purple and cream, and include at least one piece of WOW chipboard.
  • Post your layout on your blog, then enter your projects via the linky below.  Be sure to share the actual blog post address, not your home blog address.
  • There will be 2 winners. One voted on by our DT, and a random draw.
  • Remember to go to your local scrap store and grab some WOW and have a go at this months challenge.
  • Entries close Friday, 14 September 2012 at midnight.

So get into it, and have a go…hope we inspired you
happy Scrapping….from the WOW Team x x x

Thursday, August 9, 2012

I like it in the raw!

Chipboard is so versatile...and the WOW design team have shown you so many ways to treat the chipboard pieces...however, left in it's natural state, it's just as beautiful. Raw chipboard acts as a neutral for your layouts, and can add a real masculine feel.

For this layout, I have added three different pieces of chipboard. Each piece has been left raw, and clustered together with other elements. By leaving each one raw, and placing them in a triangular formation, I have created balance on the layout.
 Here's a few close ups...the two frames are brand spanking new and will be available for sale soon!!

Whilst you've got your supplies out...why not whip up a card!  I love WOW's banner borders, and with just a touch of doodling, and some twine across the top, they don't need any further dressing up!

Banner borders C810
The next time you decide to add chipboard to your projects, why not consider leaving it raw!

Cheers, Lis.

Monday, August 6, 2012

Product spotlight | Precut chipboard titles...

How many times have you created a layout, and had no idea what to call it?  It's a common occurrence at out local crop night and we all put our heads together to come up with the perfect title for the struggling scrapper.  Words or Whatever can solve that problem! WOW cuts a huge range of precut chipboard titles that will end that burden once and for all!  You can use them as is, alter them, or add them to sticker lettering to create a brand new and unique title.

For this layout, I have used a chipboard title that is designed for use at Easter time. By removing the Easter eggs that were attached, I have been able to repurpose the piece for a layout inspired by a cooking session!
The chipboard title has been coated in brown marker, then each letter highlighted with white gel pen.  A glaze over the top gives it a nice, shiny appearance.  The bracket bookplate has been given the same treatment.

WOW products used:
Egg-stravaganza chipboard title C1489
Bracket Bookplates C1090
Words or Whatever can also cut speciality titles just for you! Is there a place that you've visited, a sports team you follow, or perhaps something you kids always say, that you'd love to have as a title for your next scrapbooking project? Ask you local or online scrapbook store to contact Words or Whatever to cut your custom title!

Cheers, Lis.

Sunday, August 5, 2012

Product feature | AltaMATZ Clouds

Hi All! Lisa Warren here...and I'll be hosting the WOW blog this week, where I'll be showcasing a few of my favourite WOW products.  Today's product...the gorgeous Cloud AltaMATZ.

AltaMATZ are made from a heavy duty acrylic, that you can use to create designs on your layouts using your favourite medium...inks, chalks, paints, mists, pens and more!  For this layout, I have created a soft cloud background using my favourite ink colour...umber.  I have applied the ink through the AltaMATZ using a dabber...pushing more ink into the top portion of the clouds, feathering it out towards the bottom.

I have also included one of the acrylic clouds as a part of an embellishment cluster to replicate the inked versions.

To add more interest to the bottom of my layout, I have adhered the "Sandra" flourish directly onto my photo, together with some Heidi Swapp word stickers.  The flourish has been trimmed in half and left raw.  Leaving the chipboard raw allows the other colours in my layout to pop! The other half of the flourish has been saved for a future layout...doubling the value I've gotten out of my chipboard.

WOW products used
AltaMATZ 12x12 Clouds | ALTA026
Sandra Flourish | C1492
Ask your local or online scrapbook stores about WOW products today.

Cheers, Lis.

Monday, April 2, 2012

WOW"s new Round Doily Frame

Hi All...Lisa here to bring some WOW inspiration this Monday morning.  Words or Whatever recently released four new round frames...the chunky cog, the round doily, the ornate round, and the cog frame.  Each frame measures approximately 11.5" across, and can easily be covered with one piece of patterned paper.  The frame itself comes in two pieces, the decorative front, and a solid back...both constructed from sturdy mdf.  Today, I'm going to share with you how to create a shabby chic round doily frame, that would make the perfect Mother's Day gift!

For this project, I have used WOW's :
Here's the round doily frame all decorated...


and here's how...

Step One: Cover the solid back
Cover the back in your chosen patterned paper. I have used Prima's new Nature Garden "Midsummers Eve" patterned paper.  Make sure you spread your glue evenly over the mdf to ensure you don't end up with any bubbles in your paper. Smooth out your patterned paper with a brayer if necessary.  Once dry, carefully trim away the excess patterned paper using a craft

Step Two: Paint the decorative front
To coat the front, I have used Antique White paint. Mix your chosen colour paint with a gel medium, then use a spatula to coat the decorative front side of the frame.  The gel medium allows you create a dimensional surface.  Once you have spread the paint across the piece, create a stipple effect by dabbing the surface with a foam brush. Set aside to dry.

Step Three: Prepare the heart bunting
Ink all three pieces of small heart bunting using a coordinating ink. I have used VersaColor's "Umber".  Once dry, run a small bead of glue along the outside edge of the bunting, and adhere a strand of pearls.  I have found the best glue to use for this project is Helmar's fabric glue. The glue adheres almost instantly. Within seconds the pearls were fixed firmly to the chipboard and I was able to pick them up. To add more definition to the bunting, doodle love hearts on the chipboard using a white gel pen.

Step Four: Prepare your blue birds
Spritz or ink your birds using a mid blue. Once dry, rub white paint across the top, then wipe off the excess.  The white paint will sink into the engraved lines on the birds to give them further definition, as seen in the picture below. Coat the birds in a clear glaze to make them nice and shiny.

Step Five: Add a little softness
To soften up the hard edges of the mdf, adhere a sheer decorative lace to the reverse of the frame.  Gather the lace to add more dimension...see picture above.

Step Six: Assemble your project
Line up the front and back pieces of your project, and glue together on the outside edge only.  Hold together firmly to ensure your pieces hold. Once again, I have used fabric glue for this step.

Drape a piece of bunting across the top left corner of your frame.  Adhere a bird at each end of the bunting so that it looks like they're holding the bunting in their beaks.  Trim off a small piece from a floral spray (Prima), and attach to the frame, then thread a decorative clock and key onto twine, and tie in a big bow through the frame, leaving the ends of the twine bow to hang down to the bottom of the frame.

Next, thread a decorative metal camera onto the rest of the floral spray and adhere across the bottom right corner.  Drape the two remaining pieces of the bunting across the bottom of your frame, and adhere.  Finish off decorating the bottom right with the remaining blue bird, a whimsical nest and inspirational words trimmed from the floral spray packaging.

Step Seven: Add your photo
Now, if you're sure that the photo you have chosen is the one that you want to display forever...go ahead and adhere it.  Trim a standard sized 6x4 to measure 5.5x4, mount on foam tape and centre in the middle of the frame.

Alternatively, to give your project more versatility, trim two Tim Holtz Ideology Memo Pins using a pair of plyers (be careful when doing this because the piece may fly off!).  Poke the memo pins through the mdf frame and thread your photo onto the pins. You will then be able to change out your photo any time you wish!

Here's the completed project again...

WOW's new circle frames are so much fun to create! Try using one of the cog designs for a more masculine look, swapping the flowers out with WOW's smaller cogs, and using more manly metal embellishments...maybe you could raid hubby's toolbox!

Ask for WOW's new circle frames at your local or online scrapbooking stores today.

Cheers, Lis.

To view more of Lisa's work, visit the Life as we know it...blog.