Photobucket Photobucket Photobucket Photobucket Photobucket

Monday, May 30, 2011

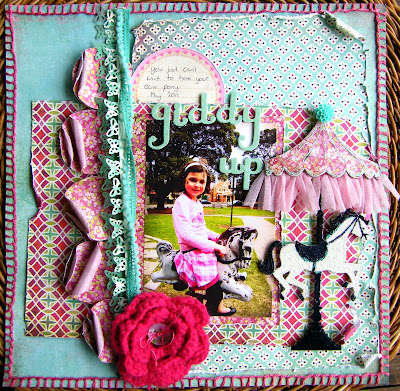
Giddy Up!

Hi, Today I'm showing one of my favourite chippies the carousel horse, which comes in two different styles one with the roof C1144 and one without C1145, I just had to wait until I found the right photo to use it with and when we where at a  park on the weekend Milly found this vintage rocking horse and ran straight to it, she just loves animals and can't wait until she can have a pony herself.
To create this carousel horse follow these steps:
  1. Paint the horse in white, also paint or use a black marker for the poles.
  2. Using an embossing pad and powder cover the horse and set.
  3. Paint or use a marker colouring in parts which you want black.
  4. Cover the roof with paper and sand around the edges.
  5. Bend the roof into shape and add some trim.
  6. Cover the black parts of the horse with Glossy Accents,
  7. Add touches of Kindy Glitz to the white parts and some of the roof.
  8. And to finish it off add a flower to the top of the roof.

Thanks Gilly oxo

Wednesday, May 25, 2011

a few cards

Here is a very short and sweet post with some cards....


This first one is a simple card using a double sided paper from which one side has had flowers fussy cut and then the reverse side of the paper is used as the base. I have then added a circle from the circles pack and layered the flowers around it. Then add a sticker, this one is from 7gypsys.


 The next three cards are made using one of the Big Girls Blooms by Linda Baldock. I was at a crop last week and Linda had a bag of them on her side of the desk...i stole one!!...and made 3 cards from the one chipboard flower...not bad for the budget conscious hey!

On this card, i poured a heap of wet glue and put a piece of tissue paper on the top and scrunched it up. With the outside shape of the chipboard bloom,  Icovered it with paper and filed the sides off. Added a tag and sticker.

 This card has the centre of the chipboard bloom, i have used a embossing tool to add highlights to the petals, inked the flower and wrapped some string around the centre with a tag on the string . I have cut the same shape as the flower from a embossed cardstock, inked it and layed it under the chip flower.


 With this part of the bloom, i have cut a shape the same size, use a double sided paper for effect, then cut into the petals in strips and then twirled a few of them with a quilling tool. Then place this on the top of the chipboard bloom and use a sticker for the centre of the flower. Add a ribbon bow to the base.


Just a few examples of what you can use just one bloom to make. Your chipboard shapes are good templates for card makers to use.

Get your local scrap store to get some of these lovely flowers in soon....and make a few cards for your stash! Be-friend us on Facebook and upload your creations for us to see.

Til later
happy scrapping
San  xxx

Sunday, May 22, 2011

'Summer Fun' scrap page


Hey Ladies,

Here is a page I created using the 'Flower Button Set' chipboard from Words Or Whatever. I coloured these using 'Smooch' (for those of you that don't know what this is, it's a metallic/pearlised accent = Lots of colouring fun!!) This page started out as a boring line-ruled paper, & with the use of distress inks, glimmer mists, stencils & paint - it became a really bright, fun background. Above is my video as I run through how I created this masterpiece!!!

Thanks for watching,
Anita

Friday, May 20, 2011

Gorgeous Butterflies

It's been a while since I've had the joy of sitting at my desk and creating.  It's been a busy busy household here, getting ready to go on holidays and trying to get all the work out the door to clients, get ourselves and the kids packed, get the house clean and tidy for our friends who will be house-sitting ... we will definitely deserve that holiday by the time we get there. It's been a long time coming - 3 years waiting - one week to go :)

Today is my day for another WOW post.  

I like this cute layout of my DD enjoying herself at pre-school. I've used Basic Grey Urban Prairie papers, thickers, Prima flowers, Kaiser bling and a Fiskars border punch.  


The gorgeous chippy is of course WOW and it is one of my favourite butterflies.  I've painted it with pink paint, added a few rhinestones for the body, and to add some dimension and make the wings a bit opaque, I backed the wings with some tracing paper.  I like how it now makes a contrast to the background paper rather than being able to see the background through it. 


Thanks for dropping by!

Cheers, 

Monday, May 16, 2011

Custom Made Decorations for your Functions - Round 2

You may recall an earlier post i did about 
Custom Made Centrepeices from Words or Whatever
If not, here is the post
In that post I promised to share with you the photos from this years 
Debutante Ball
"Catch a Falling Star"

Here is the centrepiece that Suzanne made for us.
I assembled it
gave it a coat of black
and sprinkled fine purple glitter over the top
and there is a candle in the centre....


Here is the overall effect.
It good to see how it all worked in with the overall look.

Stage:


Room & Ceiling


Room


Down the right side:
You can see the little centrepeices...


The cake complete with stars... 


The Debs & Partners. 


 So you can see that these adorable little centrepieces were perfect and tied in with the theme so well!
When planning your next event why not try
Words or Whatever.

Monday, May 9, 2011

Creating Layering Layout And Video

Hi, This post I wanted to do create a layout about myself and I love the song Landslide by by Dixie Chicks and I always sing it in the car and shower lol!
This part of the song is talking about how we are all children at heart, even though we sometimes forget about the simple things and fun things in life because we get so bogged down, that our child in our heart needs to rise above and enjoy life or the moment for what it is.
To create the layered look, I starting with spraying the flourish with Glimmer Mist then wrapping muslin in strips around the flourish, I then added some butterflies, flowers and bling.

And here is a technique video on Resist Stamping on Wow Chipboard.

Thanks Gilly oxo

Thursday, May 5, 2011

GUEST DESIGNER - SUE OLIVER

This week we have a special Guest Designer - Sue Oliver.  Sue has decorated our new Gate Album (M174) using lots of our chipboard - see if you can spot them all!!


How gorgeous has this turned out??

Thanks Sue for showing us your lovely album.

Tuesday, May 3, 2011

Waiting For You

Hi Everyone, It's Katrina here and I'm going to share with you an album I've created from the WOW MDF Teddy Bear Album for a much awaited baby and will also show you how easy, simple and fun it is to alter these albums to make the covers into fun little shaker boxes!!!

Firstly here is the album!!! I love how it has come together, and the fact I was able to use pink when I live in a household full of boys and 1 tomboy was a GREAT change!!! :)


So did you see the little shaker boxes on the feet of the Teddy Bear cover? Do you want to know how to make them? Well read on :)

HOW TO MAKE A SHAKER BOX
featuring WOW mdf Teddy Bear album


To start with choose your album. Any with a fully enclosed cut out part on the front cover works best. I have used the WOW MDF Teddy Bear Album that is illustrated HERE

The materials you will need other than general scrapping supplies are:
~ sheets of acetate
~ glitter or pretties to out inside your shaker box
~ glue that is suitable for acetate - or double sided tape


Before we really get started you will need to decide what part of the album you are going to turn into a shaker box. I've decided to use the large foot pads on the bear. The sections that are 'cut' are either loose or can be easily removed for this purpose. Once you have decided on what part will become a fun toy make a template of your cover. Make sure you mark in the holes that will become the shaker box - THIS IS REALLY IMPORTANT!!!! I didn't do it on mine and wasted HOURS getting the cover decorated which should have been an easy thing to do (trust me to miss something super simple!!!)


Step 1: Cover one side of the album with glue where you are going to adhere acetate. I have used a full sheet of acetate to cover the whole of the album as I wanted the eyes and 'hands' to be clear to allow the patterned paper on the 3rd page to show through.


Step 2: Carefully lay the acetate over the required areas


and smooth the glue underneath. Don't worry too much if the glue 'bleeds out',
it can easily be cleaned up with a moistened cloth.

Allow to dry overnight. I recommend weighing the acetate and mdf to avoid any possibility of buckling.

** Not all glues adhere acetate successfully. You can use
Double Sided Tape if you prefer - make sure there are no gaps in the DST,
you don't want your pretties to escape!!!
(I had to change to DST as my glue didn't work)

Step 3: Once the glue has dried or you've adhered the acetate with DST trim around the OUTSIDE of the album to make sure there are no bits sticking out and to keep things nice and tidy.


Step 4: Flip your album over and it's time to add your 'pretties' Avoid anything too heavy as it can scratch the acetate or even worse make the seal between the acetate and MDF separate!!


Step 5: Trim up a piece of acetate to cover the back of your shaker box. Adhere using glue or DST, again making sure there are no gaps for your pretties to escape through!


VOILA!!!


Step 6: Time to Decorate. Remember the template you made? It's time for that to be used, choose what papers you wish to use to decorate and cover your MDF page with and using the template cut out the holes that will allow your shaker box to be revealed. Alternately you may wish to paint your page - as with the glue, not all paints will successfully cover acetate.

Trim, primp, decorate until you're happy with your page and enjoy!!! :)

My finished and decorated Shaker Box "Paw"